Week 2: More Academy
February 6th
Notch Learn
I explored the Notch Learn tab on their website and found very useful tools that will help me as I continue my Notch learning!
The tab is broken up into 7 different sections: Manual, Notch Academy, Timelapses, short tutorials, training, samples, and free notch blocks.
- Manual:
- To me, this is the most interesting and helpful one. So far I have looked through the User Interface section. I really like how they include pictures so you know exactly what they are talking about that way you can also see where everything is located. The whole manual is something that I will be constantly be referring back to and re-reading. You can also download it which is pretty neat.
- Notch Academy:
- I have been following along to Notch Academy as I dip my toes into the program and I have found them to be quite useful. I am going to continue following off and also branching off from it to explore the topics I am most interested in.
- Timelapses:
- The timelapses are fun to look at and I suppose if you slow them down enough it might be possible to even follow along to. It is incredible what these Notch artists are creating.
- Short Tutorials:
- Once I am done with Notch Academy I might dive more into the short tutorials. Some of them say ‘old’ on them. I am assuming they are from previous versions of Notch but they still are probably handy to look into.
- Training:
- I definitely do not have the money to go to a training session but if I did I would go.
- Samples:
- Once I buy my Notch Educational License I am going to download these Notch Samples so I can “find, tweak, break, fix, learn” from them as the websites say. I find these types of files incredibly useful as you can just dive from node to node, look at the connections between nodes and the order of them to see how things are done.
- Free Notch Blocks:
- I always enjoy free things. Like the samples, I am definitely going to download them just to play around and see what they do.
February 7th & 8th
Notch Academy:
004 Basic Video Processing, 005 Advanced Video Processing, 006 3D Workspace and Animating, 008
001: Cloners
Cloners have opened the floodgates for my imagination to what is capable of in Notch. They remind me heavily of instancing in Touch Designer but it is 10x easier to navigate. I like how there are different types of cloners and even within the cloners, you can change many different aspects to it. The nodes I found most useful were the cloner effectors. They work in a very interesting way that I really love. I like that you can easily manipulate the area these effectors are affecting, how far they “throw” the thing affected, and the bounding boxes that can be changed so much.
One thing I did have a problem with is that my handles and bounding boxes kept disappearing and I could not get them back; I even doubled checked I had all the appropriate boxes checked. I googled it and found that they disappear whenever you have your timeline playing. After I saw this, I tested it and that appeared to fix my problem or so I think because cannot remember if when it happened to me when I noticed I had my timeline playing. I will have to be mindful and see if it happens whenever the timeline isn’t playing or if it was just me not paying attention.


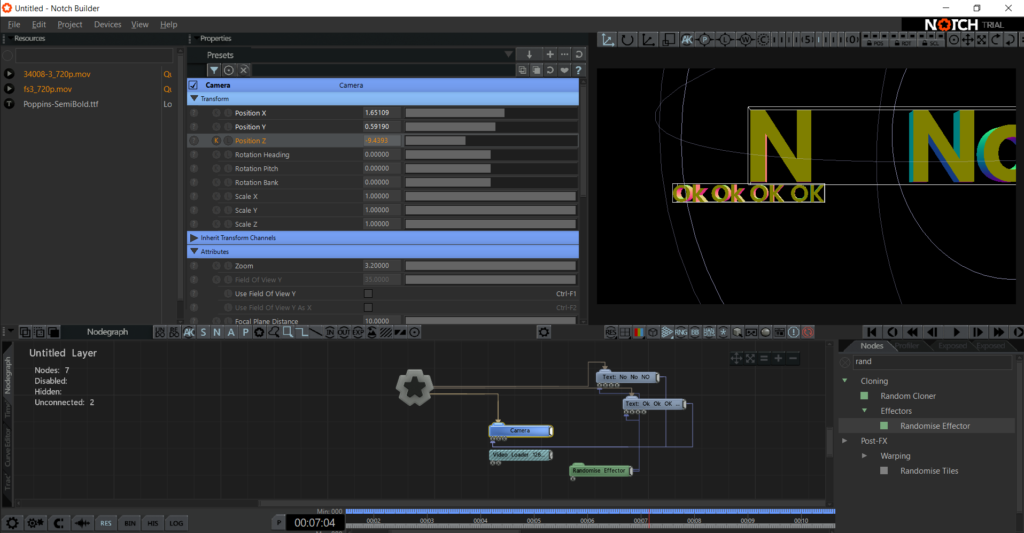
003: Text
Text in Notch was fun to explore. I really like how you can also use the effectors found under cloners to animate the text. I will definitely be exploring Text in Notch further to see what else it is capable of doing.
I also gave cameras another shot while using Text because the cameras were something that I was struggling with last week. I guess they are not as hard as I thought they were at the beginning but it did take a bit taking used to. The camera shortcuts on the viewport are a bit confusing just because they have so many and I haven’t memorized which camera is which without hovering over the different buttons but I think I am getting the hang of it.
I did not really understand the whole “input text from other sources” bit from the video. I think I just lack the knowledge in what sources can input text into Notch or what sources, in general, can be input in there. I know what OSC is and I’ve used it before through TouchDesigner, yet I have no idea how you can input it in through Notch. I think I will also check out the manual and see what I can find over it.
006: Audio Reactivity
This was the video I was most excited to get to as it is a big part of my independent study. I do wish it had been a bit longer but I know there is other tutorials on youtube that I can explore, this is just the intro to it. I found this awesome tutorial by Kev Zhu that I am excited to follow along too as it is along the vein what I envision on doing. By using the cloner I can see how you can further expand the range of visibility in shapes that are reacting to audio. I really like how you can fine-tune what your shape is reacting too like the different audio bands you can hone into so the sound reactivity is not all over the place. Notch seems to handle Audio a lot better than TouchDesigner. From my experience in using audio in TD, it does not like full audio files. Anything longer than 30 seconds and it starts to go haywire. I always use an external source like QLab if I want to “import” audio to TD but Notch appears to be really good at supporting it.
The one big question that I have at the moment I have is that I am not exactly sure how you can make the timeline longer? It seems to only let me play the first 30 seconds of audio. I will have to take a look into the Notch Manual to see how I can expand the timeline as I am sure it is something that I can do. I also wonder if there is a way you can slide down the timeline. If, for some reason, you can only play 30 seconds at a time, can you scrub down the timeline to be in a different 30 seconds of the song?
008: Media Servers/Exposed Values
As I am still using the trial version of Notch I was unable to follow along to this tutorial but it did answer some of the questions I had regarding performance in Notch but I still have a lot.
In TouchDesigner when you press F1, your performance window pops up. You can make this performance window as big as you want so it spans over various screens and you can have one screen that is dedicated to being a controllable UI. From what I understood in the video, you cannot really do that in Notch? I think you also have to have a separate media playback computer in order to playback what you are doing if you are using it for a live event and if you want to manipulate whatever you created on Notch you can only do it from the Notch programming window? This is what my brain managed to understand. It is a very confusing sentence but it makes sense in my head.
But really I think I don’t fully understand how playback works in Notch or maybe I do and I am just confusing myself. I know that the PLAI lab will have a computer designated to playback that I can use to test this all out but for now, I will just have to keep watching videos explaining Notch playback.
To see my progress in Python for this week, click here.